
Three Ways to Prepare a Planting Bed
Written by Hanjing Toh & Zoe Oomens
Learning Trail →Begin Your Regenerative Garden Journey
Overview
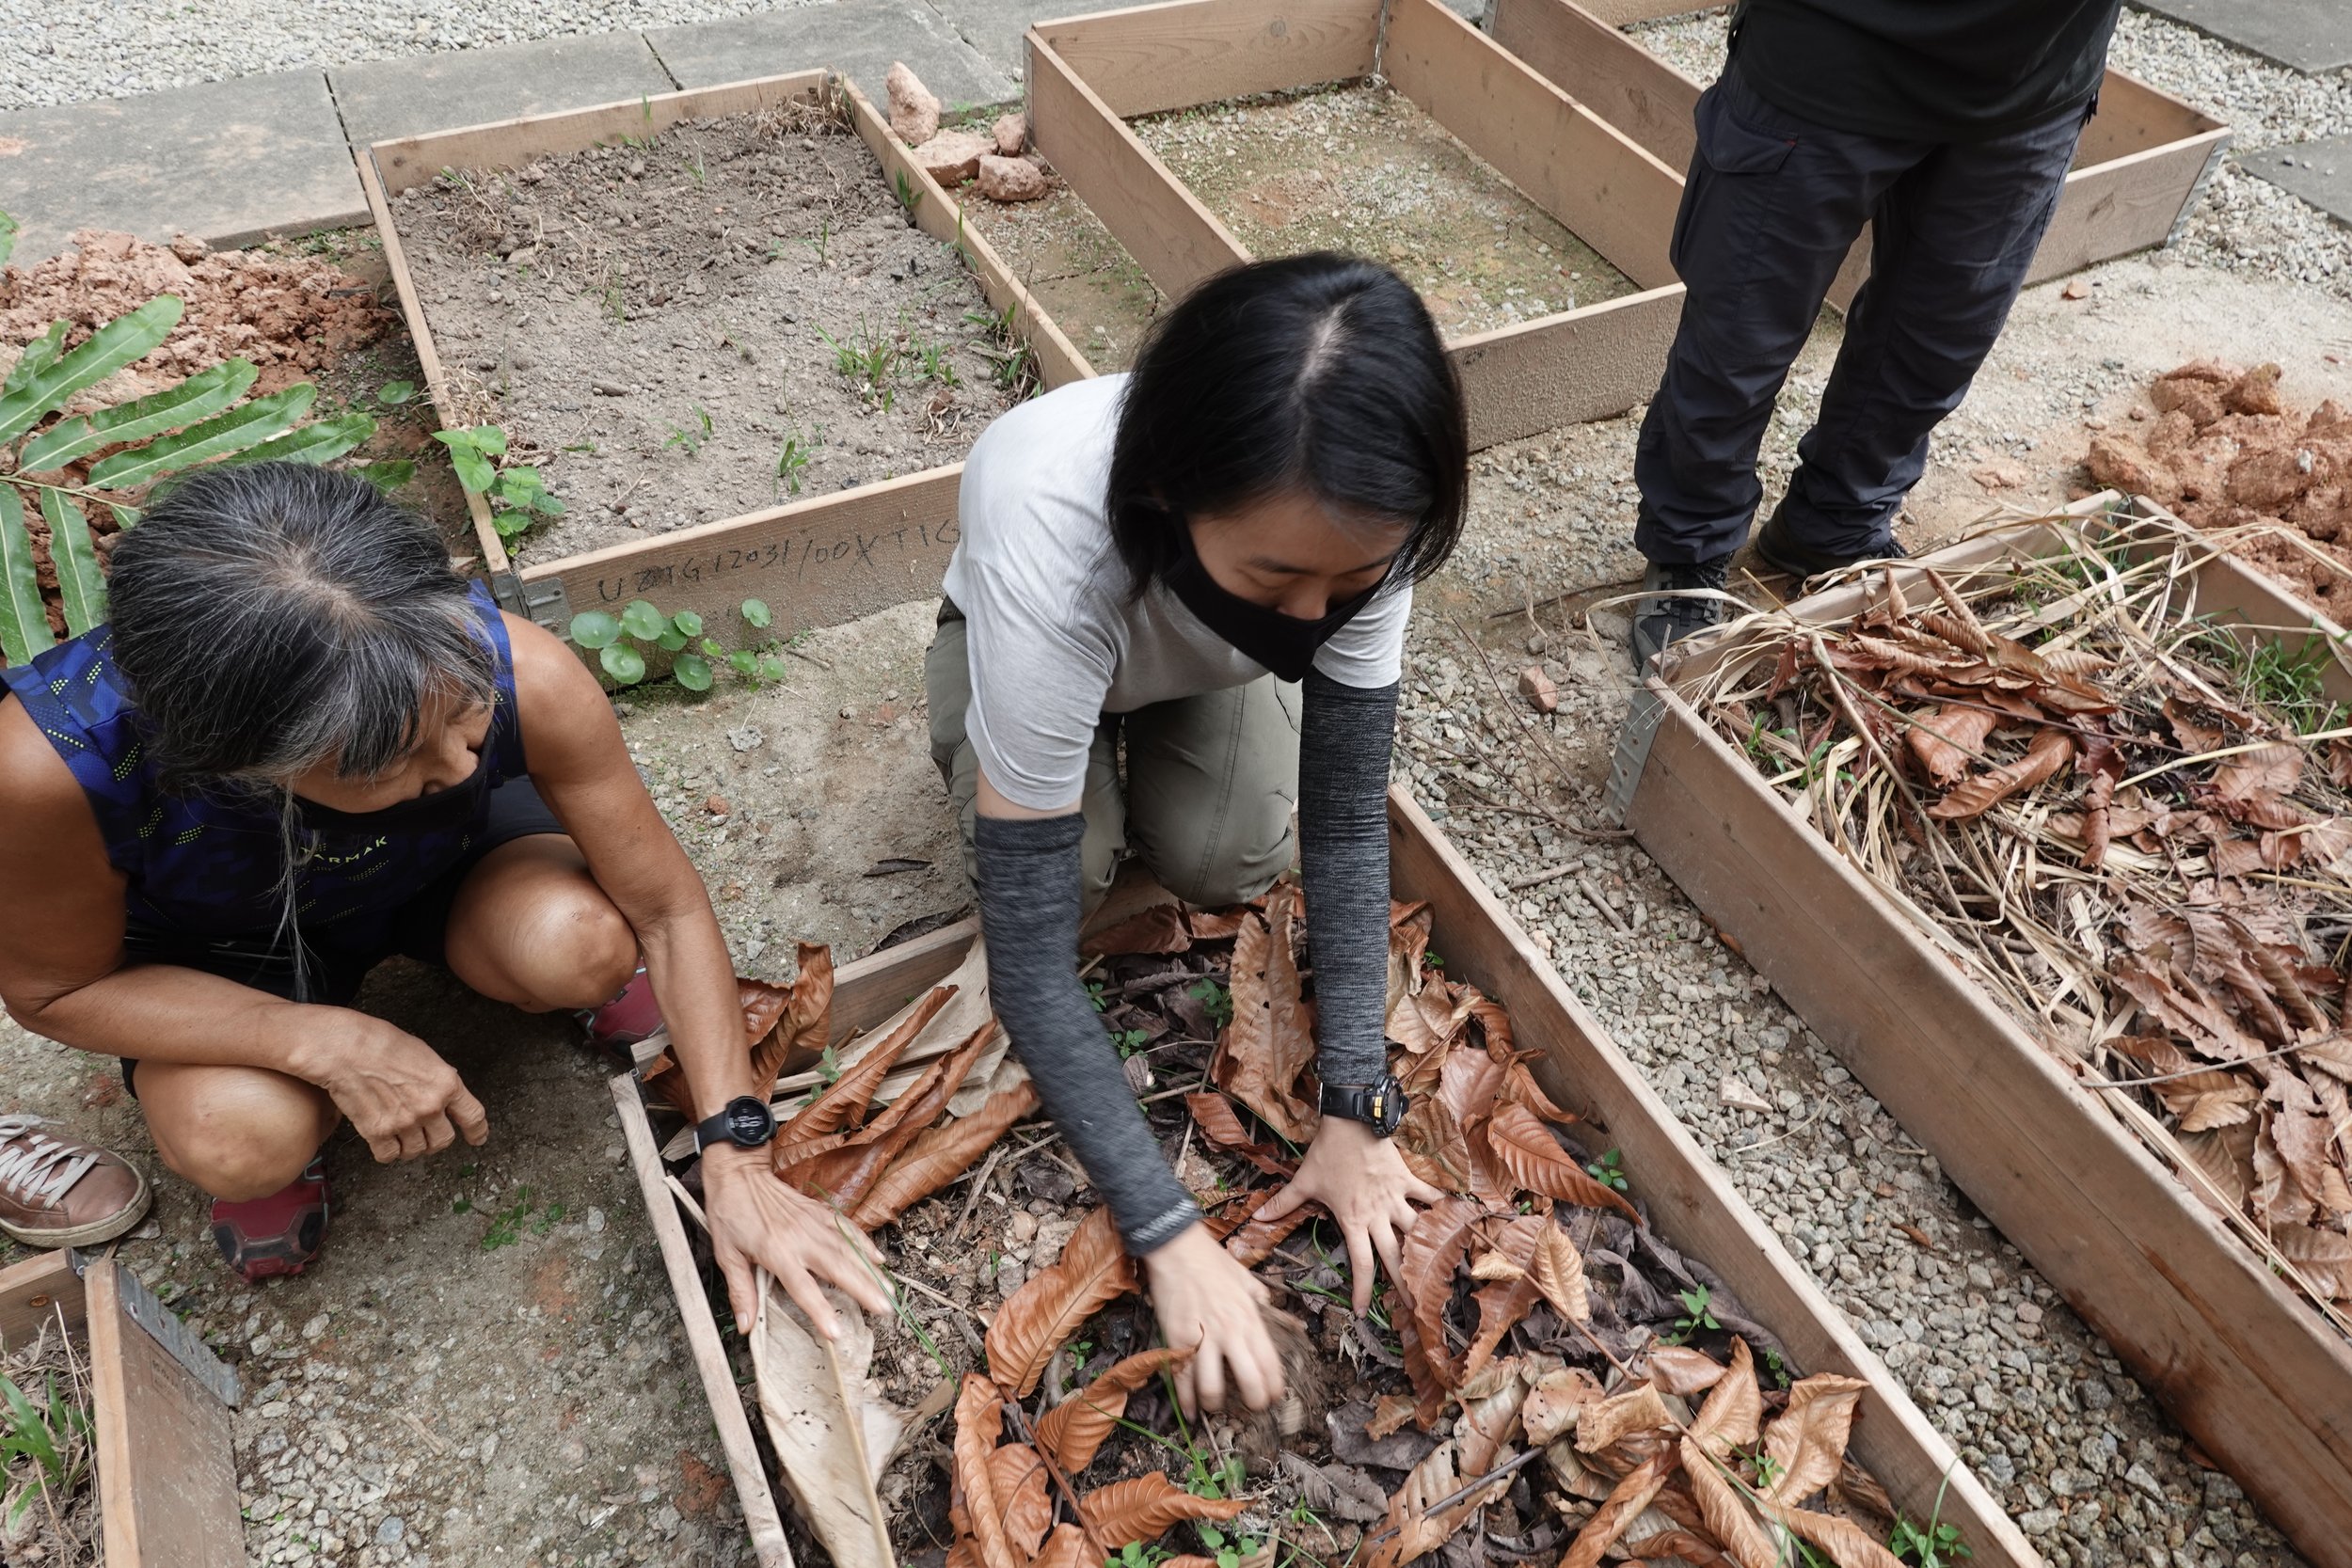
This article explores practical methods for preparing and regenerating garden soil beds using three nature-based methods : trench composting, food forests, and Hügelkultur. Drawing on experiences from community gardens in Singapore, the article shares real-life examples, gardener insights, and simple step-by-step guides that show how organic matter can be used to improve soil health, support biodiversity, and create productive growing spaces
Table of Contents
In this article, we will cover a good amount of ground, no pun intended 😉, into how to prepare your soil beds, as well as practical methods, techniques, and personal experiences from the community gardens and gardeners we’ve worked with. Soil is a major component of the Earth’s ecosystem. It provides the foundation for plant growth and health, which in turn supports human life and health. As such, soil bed preparation is essential to setting the ground for your grow bed. It is building the foundation for your growing area as to harness nutrients, water and oxygen for plants and their root systems. If done well and with intention, it can be very beneficial for the health of the ecosystem with the bonus of possibly making your stewardship easier and smoother. Similar to investing in a long-term financial plan, if done well, bed preparation will support you and your plants through multiple seasons and generations because it ensures that the soil is cared for and thereby your plants too. So while bed preparation may take time, planning and resources, it is well worth the long-term gains.
As highlighted earlier, Singapore’s soil tends to be hard and clayey. The soil in many of our gardens was likewise mostly clayey and almost lifeless (i.e., not many visible living organisms). Fortunately, our community gardeners have been able to revitalise the soil over time using techniques such as trench composting, food forests, and hugelkultur techniques.
Trench Composting
Trench composting, also known as the dig-drop-bury method, is one of the simplest and most accessible ways to prepare your plant bed. is one of the most accessible ways to begin. A trench of about 30cm is dug into the bed, kitchen scraps and plant cuttings are buried within it, and soil is replaced on top to cover. In Singapore’s tropical climate, the bed is ready to plant within around three weeks. This method also keeps your compost material out of sight while inviting the worms to feed off the waste and enrich the soil with their castings. The community gardens in JCP, MGS, and Siglap South have all practised trench composting.
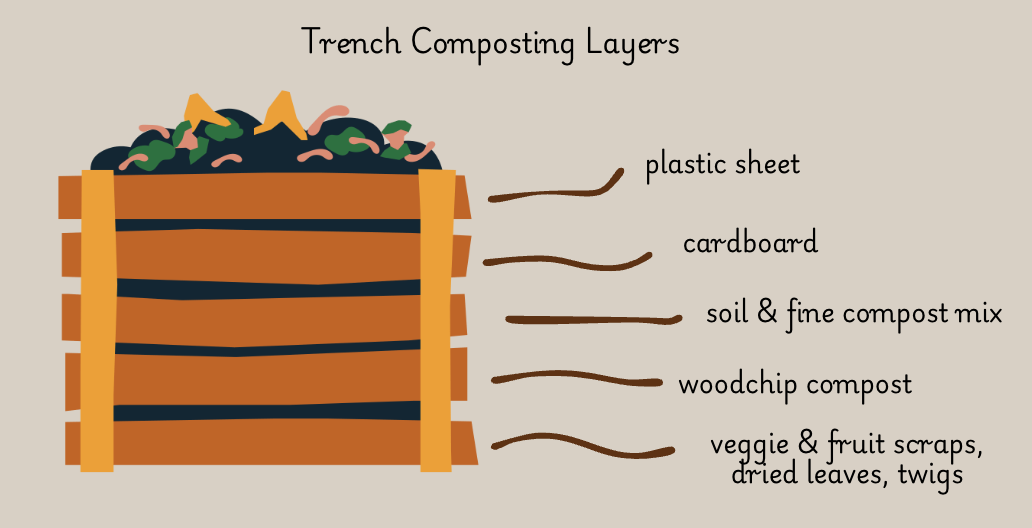
One of our fieldworkers had the opportunity to work with a team in setting up an edible garden for a secondary school. They modified the method. Instead of digging a trench, they placed the organic matter (vegetables, fruit scraps, dried leaves, and twigs) onto a flat bed then layered soil on top to create raised beds. Given the shallow roots of the vegetables, they could be planted straightaway.
HOW-TO GUIDE:
Modified Trench Composting Method
Install a wooden raised bed frame
Layer in sequence the following:
Chopped vegetable and fruit scraps, garden dried leaves, and twigs
Woodchip compost;
50/50 mix of soil and fine compost on top
Water the raised bed
Cover the bed with cardboard, put a plastic sheet over it and let it rest for 3 weeks (in Singapore’s climate)
We also recommend installing a greenhouse frame with netting to protect from pests and bugs
In week 4, transplant the vegetable seedlings into the bed
In week 5, fertilise with powdered chicken manure (can be purchased)
In week 6, foliar spray with vermicompost tea
In this case, vegetables were harvested in weeks 7 & 8 - the harvesting period may depend on your vegetable of choice
STORIES FROM THE FIELD
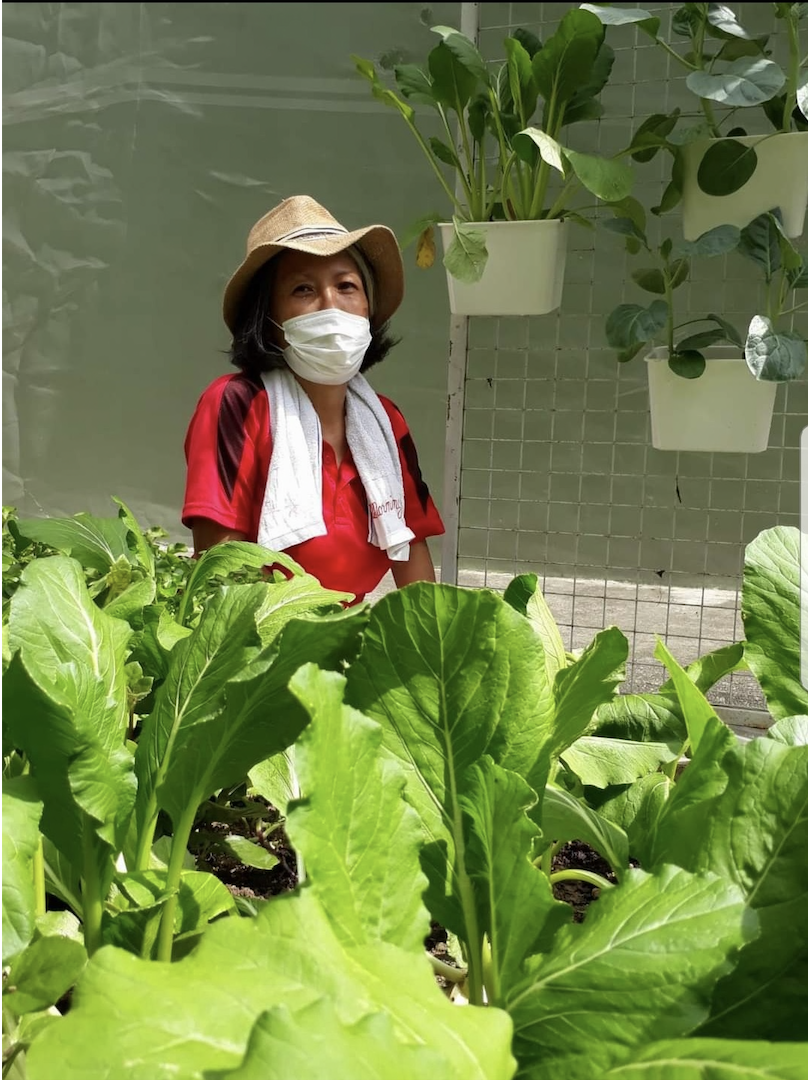
Oi Lian, Gardener & Fieldworker
I got myself interested in Green Circle ECO farm, Singapore’s first and only food forest farm because the plants were thriving well without the water sprinklers repaired. It made me rethink farming and I would like to try it in more city areas of Singapore. The tips are: mulch, mulch, mulch. The magic of mulching keeps soil moist. There were so many earthworms and other invisible microorganisms breaking down the organic matter in the mulch, releasing nutrient elements into the soil. It is an auto-pilot fertilising soil system.
Two good opportunities allowed me to prepare the soil. The first was being a worker for a subcontractor to set-up an edible garden for a secondary school and the other was creating a food forest in a planter box that measured only 3x3x1.5ft at an urban commercial farm for educational programmes.
The subcontractor was my friend, so we could discuss the methods to prepare the soil for raised beds as natural as can be with minimal purchased materials. We did an on-the-spot composting method. It was called trench composting, DIG-DROP-BURY, but we didn’t even want to spend time on digging the soil, as tilling soil would disturb the microbiomes and fungal hyphae networks underground. Given the raised bed was intended to be for vegetables with shallow roots of 5 inches, only 2 inches of food scraps with twigs were needed. The balance above it was laden with soil and compost mix.
By weeks 7 & 8, the vegetable roots were quite well established with soil clumps, although the roots were not yet 5 inches long and had not reached the composted scraps level. We also saw around 10 native garden earthworms during the harvesting. The density ratio of 10 earthworms per square metre typically indicates healthy soil.
Food Forests
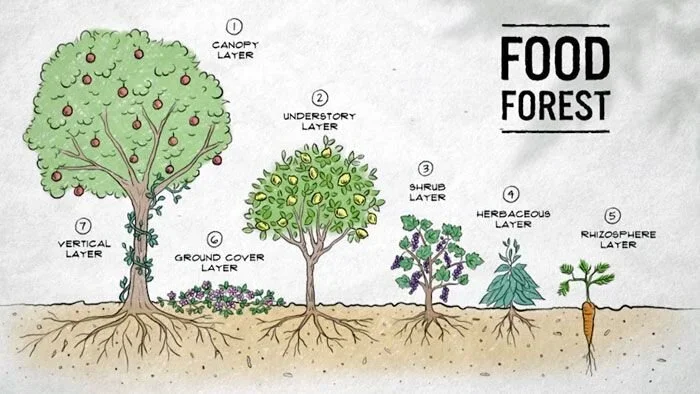
SOURCE: ABC.net
Another method is to design the plant bed as a mini food forest. A food forest mimics the layered structure of a natural forest with edible plants, combining different plants to create a harmonious ecosystem. A food forest typically consists of seven layers: canopy, understory layer, shrub layer, herbaceous layer (flowers, herbs, and vegetables), rhizosphere layer (low-growing shrubs and ground cover crops), ground cover layer (root vegetables), and vertical layer (vines).
There are many benefits to using the food forest method. Firstly, combining different plants in one area provides year-round protection of the soil. Plants such as ground cover crops and leaf litter from trees and shrubs, protect the soil with consistent coverage, conserve soil moisture, and reduce the need for watering. The leaf litter also provides additional nutrients to the soil as it decomposes within it. Secondly, the diversity of a multi-crop bed provides a better balance to the soil and makes it less susceptible to pests. Companion crops make pests confused as they don’t know where and when to attack. Finally, young plants are protected from harsh conditions by the taller trees and shrubs that shelter them. As the plants coexist and communicate, they form symbiotic relationships, providing each other with the needs they may have. This reduces unnecessary manual inputs of labour, fertiliser, fungicide, and pesticide.
Our fieldworker was able to create a mini food forest in a planter box that measured only 3x3x1.5 feet at an urban commercial farm. The limitation was that our fieldworker could only do up to four layers of the food forest in the planter box. They used as 3-foot tall mulberry plant was to be the low tree layer. Shorter stem cuttings of basil, mugwort, and cranberry hibiscus formed the herbaceous and shrub layers, while peanut seedlings were scattered on the bed to form the soil surface layer of this mini food forest. (See box for more in-depth steps on setting up this mini food forest)
HOW-TO GUIDE:
Food Forest in a Planter Bed Method
This mini food forest was designed for a planter bed of 3ft x 3ft x 1.5ft. At this scale, the planter bed can hold up to four layers, such as a small tree, climber, brassica, and creeper plants. See images below for the process.
Build the soil layers
Create a base layer using a mix of gravel, sand, twigs, 20% clay soil, and 20% woodchip compost. This provides aeration, drainage, and enough weight to stabilise the plantera
Add a top layer mix of 20% sand, 30% clay soil, and 50% woodchip compost
Optional but recommended: Incorporate 1 pail (approximately 20 litres) of homemade vermicompost and about 200 g of earthworms to support soil regeneration and nutrient cycling.
Plant in layers
Choose a variety of plants that represent different layers. These can be planted all at the same time.
In this example, the plants we had were:
Low tree layer: Mulberry
Vertical layer: Climbers such as long beans
Shrub & herbaceous layer: basil, mugwort, cranberry hibiscus, leafy vegetables
Soil surface layer: Peanuts or other low-growing creepers
Plant densely
Fill most of the soil surface with plants.
Dense planting is intentional, allowing the plants to shade one another and the soil, conserving moisture, and suppressing weeds
Harvest and prune regularly
Depending on the plants, harvesting can begin within three weeks
Regular harvesting and pruning are important to improve airflow and ventilation as the plants grow and fill up the space
Any prunings can be used as mulch to protect the soil surface and recycle nutrients
Maintain soil fertility
A food forest generally requires little fertiliser beyond the nutrients supplied by compost, earthworms, and decomposing plant matter.
Occasional applications of eco-enzyme may be beneficial.
After extended periods of growth, nutrients may need replenishing. In our case, after about eight months, heavy storms had leached nutrients from the planter, so fish organs and other natural nutrient inputs were added.
Observe and adapt
As the system matures, some plants may outcompete others, supports may be needed for climbers, and nutrients may need to be replenished
Dense planting improves productivity and soil coverage, but can also create competition for light, space, and support. Regular observation, harvesting, and pruning help maintain balance within the system.
Some plant learnings:
Peanuts worked well as a nitrogen-fixing ground cover, but dense planting limited peanut production because the flower pegs could not reach the soil.
Long beans were later introduced as a nitrogen fixer and fruited successfully, but their vigorous growth outpaced the young mulberry tree's ability to support them, and had to be pruned back.
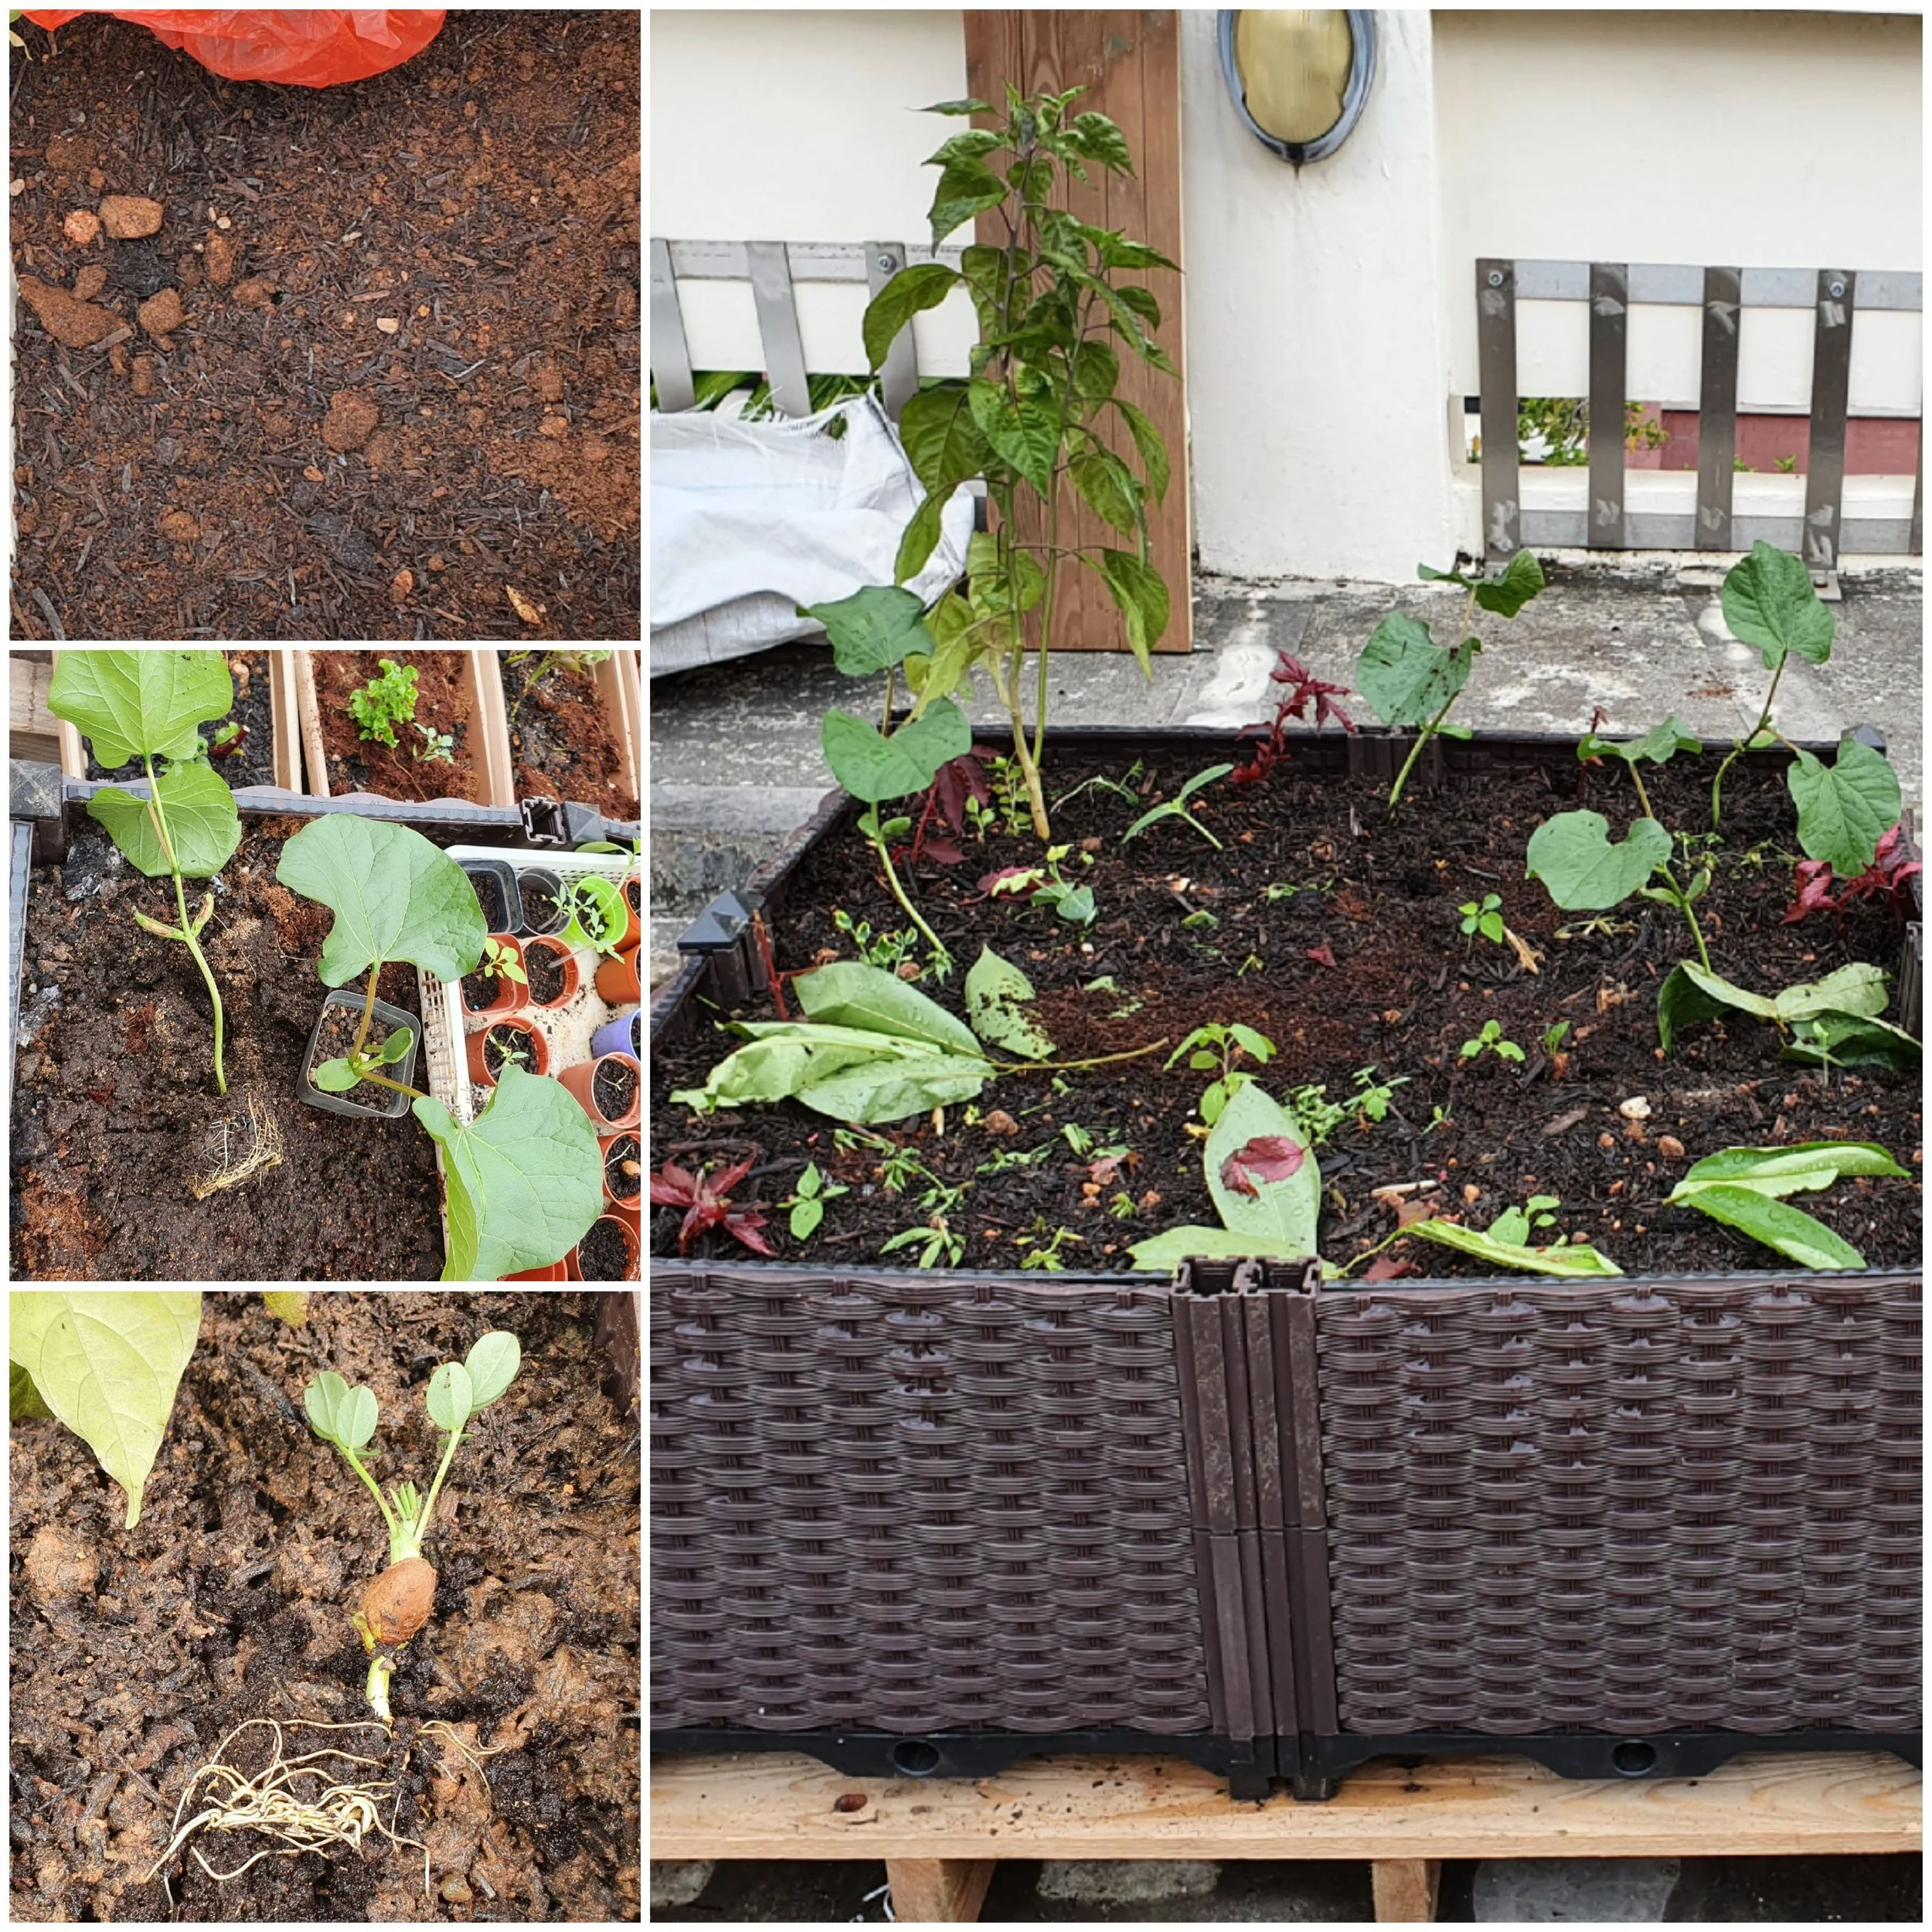
Beginnings of the food forest
(From top left anti-clockwise)
Top layer soil and compost ready to plant.
zucchini seedlings
peanut seedlings
Initial beginning of the mini food forest
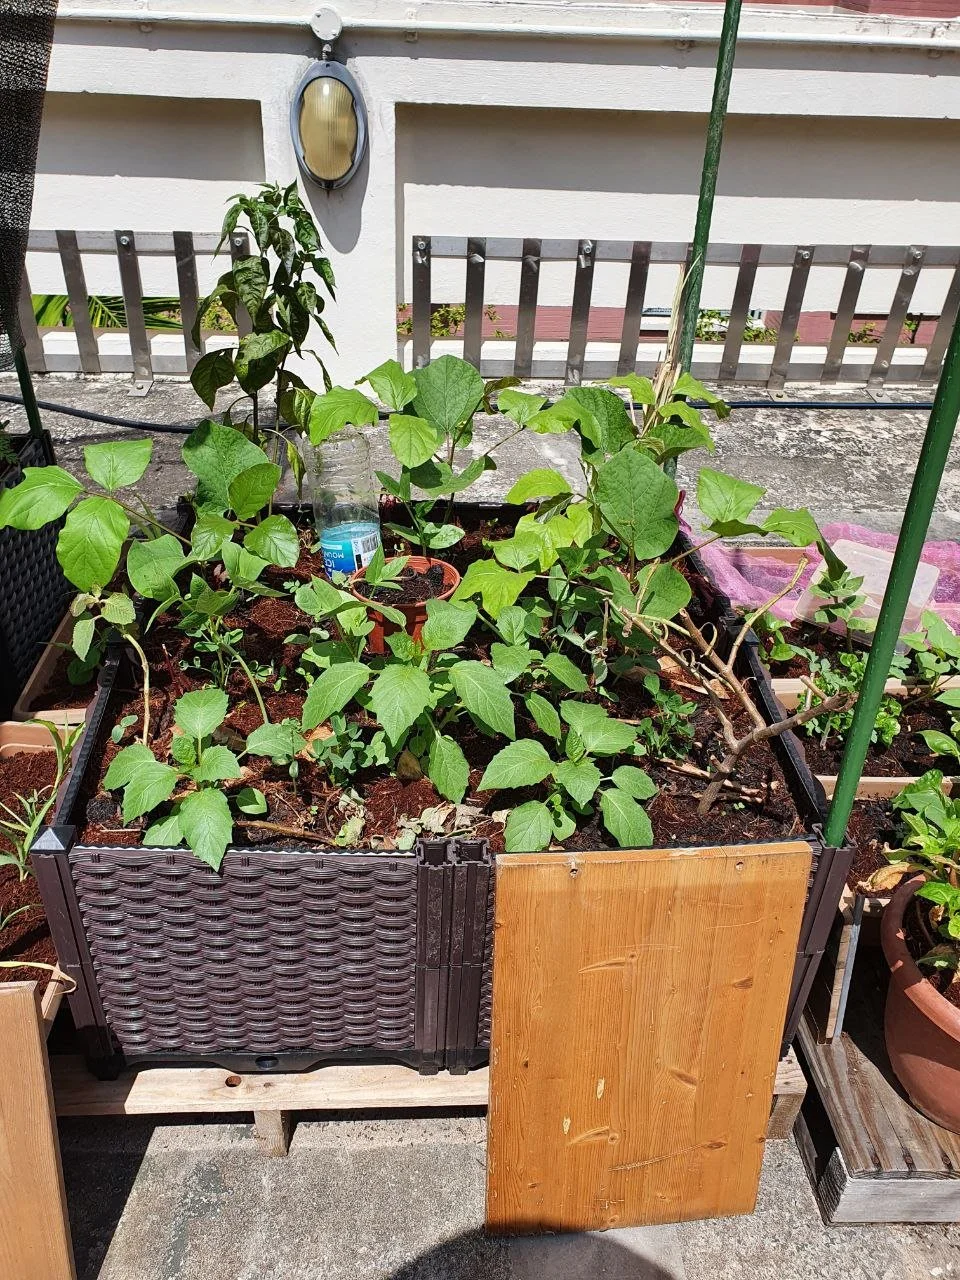
Food forest in progress
A few weeks after initial planting, the plants grow and begin to shade each other and the soil
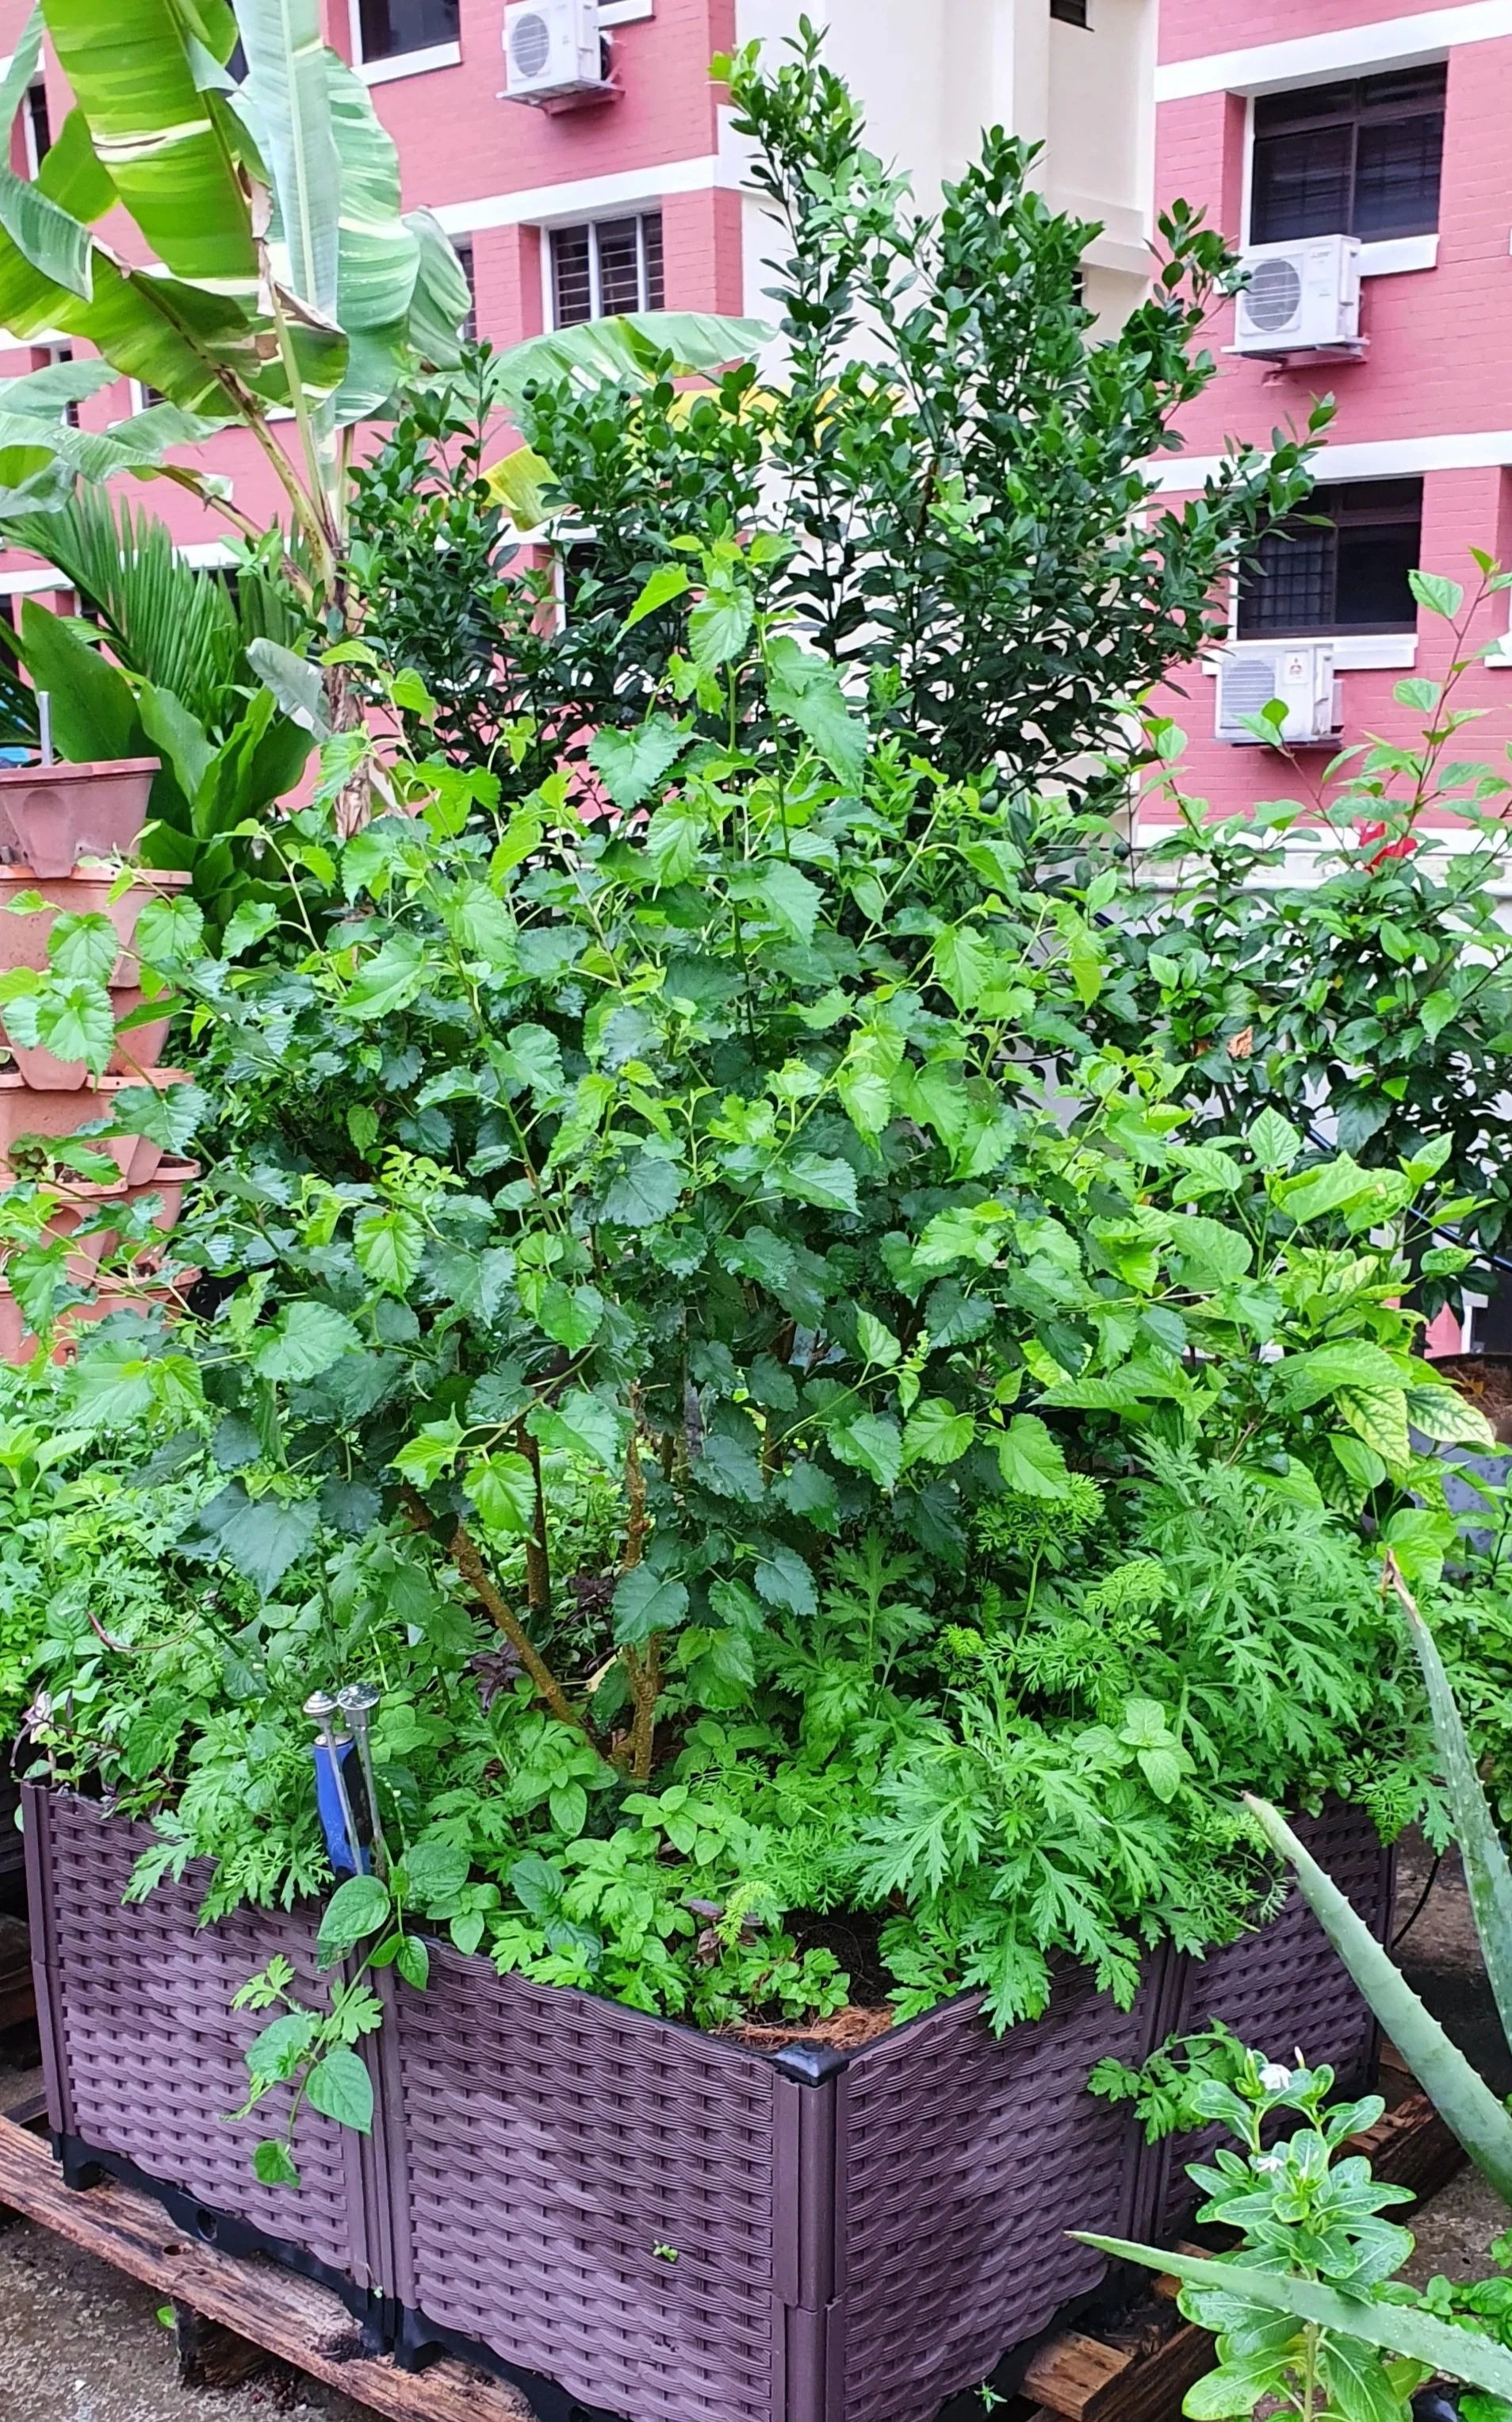
A lush mini food forest
Months later, the plot looks more akin to a forest than your average planter bed
Hügelkutur
The third way in which the gardens have been preparing their beds is through Hügelkultur. Traditionally, a Hügelkultur bed is an above-ground mound built from layers of logs, nitrogen-rich clippings, compost and soil. This technique is used across Europe and is commonly used in permaculture designs.
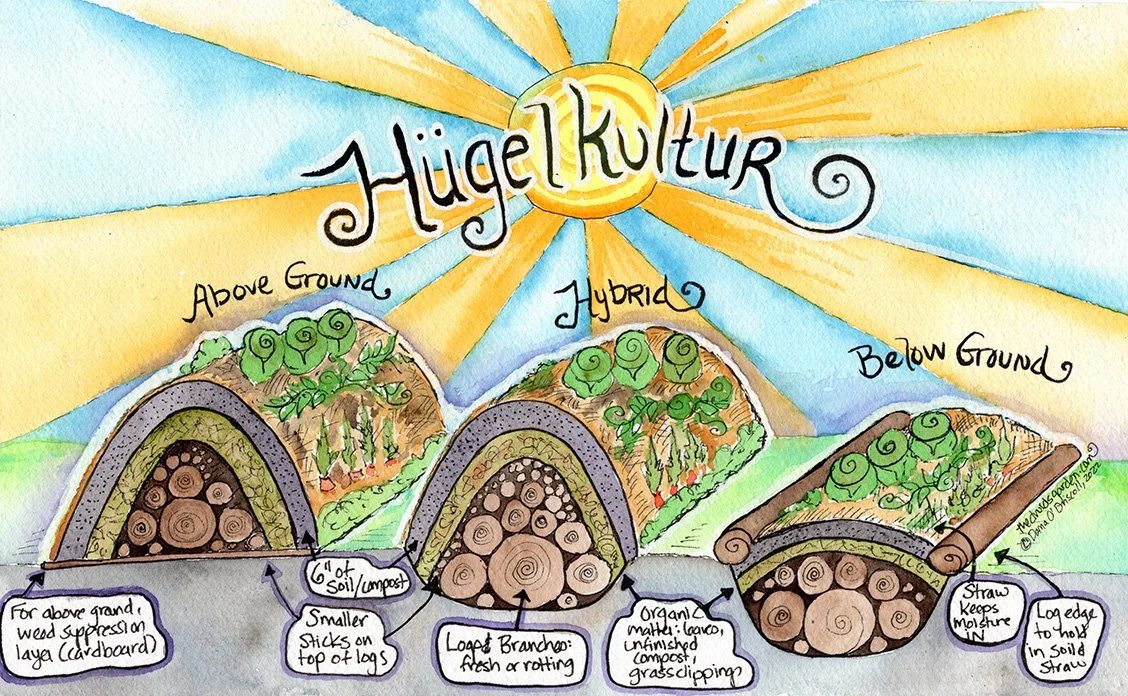
Source: thedruidgardens.com
In the gardens that we have worked with, the bulk of the Hugelkultur bed is underground with a much shallower mound on top. There are two reasons for this. Firstly, the sight of a traditional Hügelkultur mound resembles that of a burial ground and can be rather big and attract unwanted attention and complaints - most gardeners prefer to have it partially underground to avoid any possible conflict. Secondly, since the soil beneath is often compacted with construction debris, most gardeners will need to improve the soil food web below before growing anything above.
This method has many benefits. Firstly, it allows for more active fungal growth since the base is mainly built with logs, branches and twigs. A fungal-dominated bed is best for trees and perennials, whereas a bacteria-dominated bed (i.e. made of nitrogen-rich materials) is best for vegetables and annuals. You can recycle and reuse naturally decomposing materials from around the garden area i.e. if there are plenty of trees growing around the area. In cases where it’s fully aboveground, there is no digging involved, which helps save precious soil life, and your back too! Finally, you can leave it alone for a longer period of time without having to tend to it, and it will still continue to support microorganism activity.
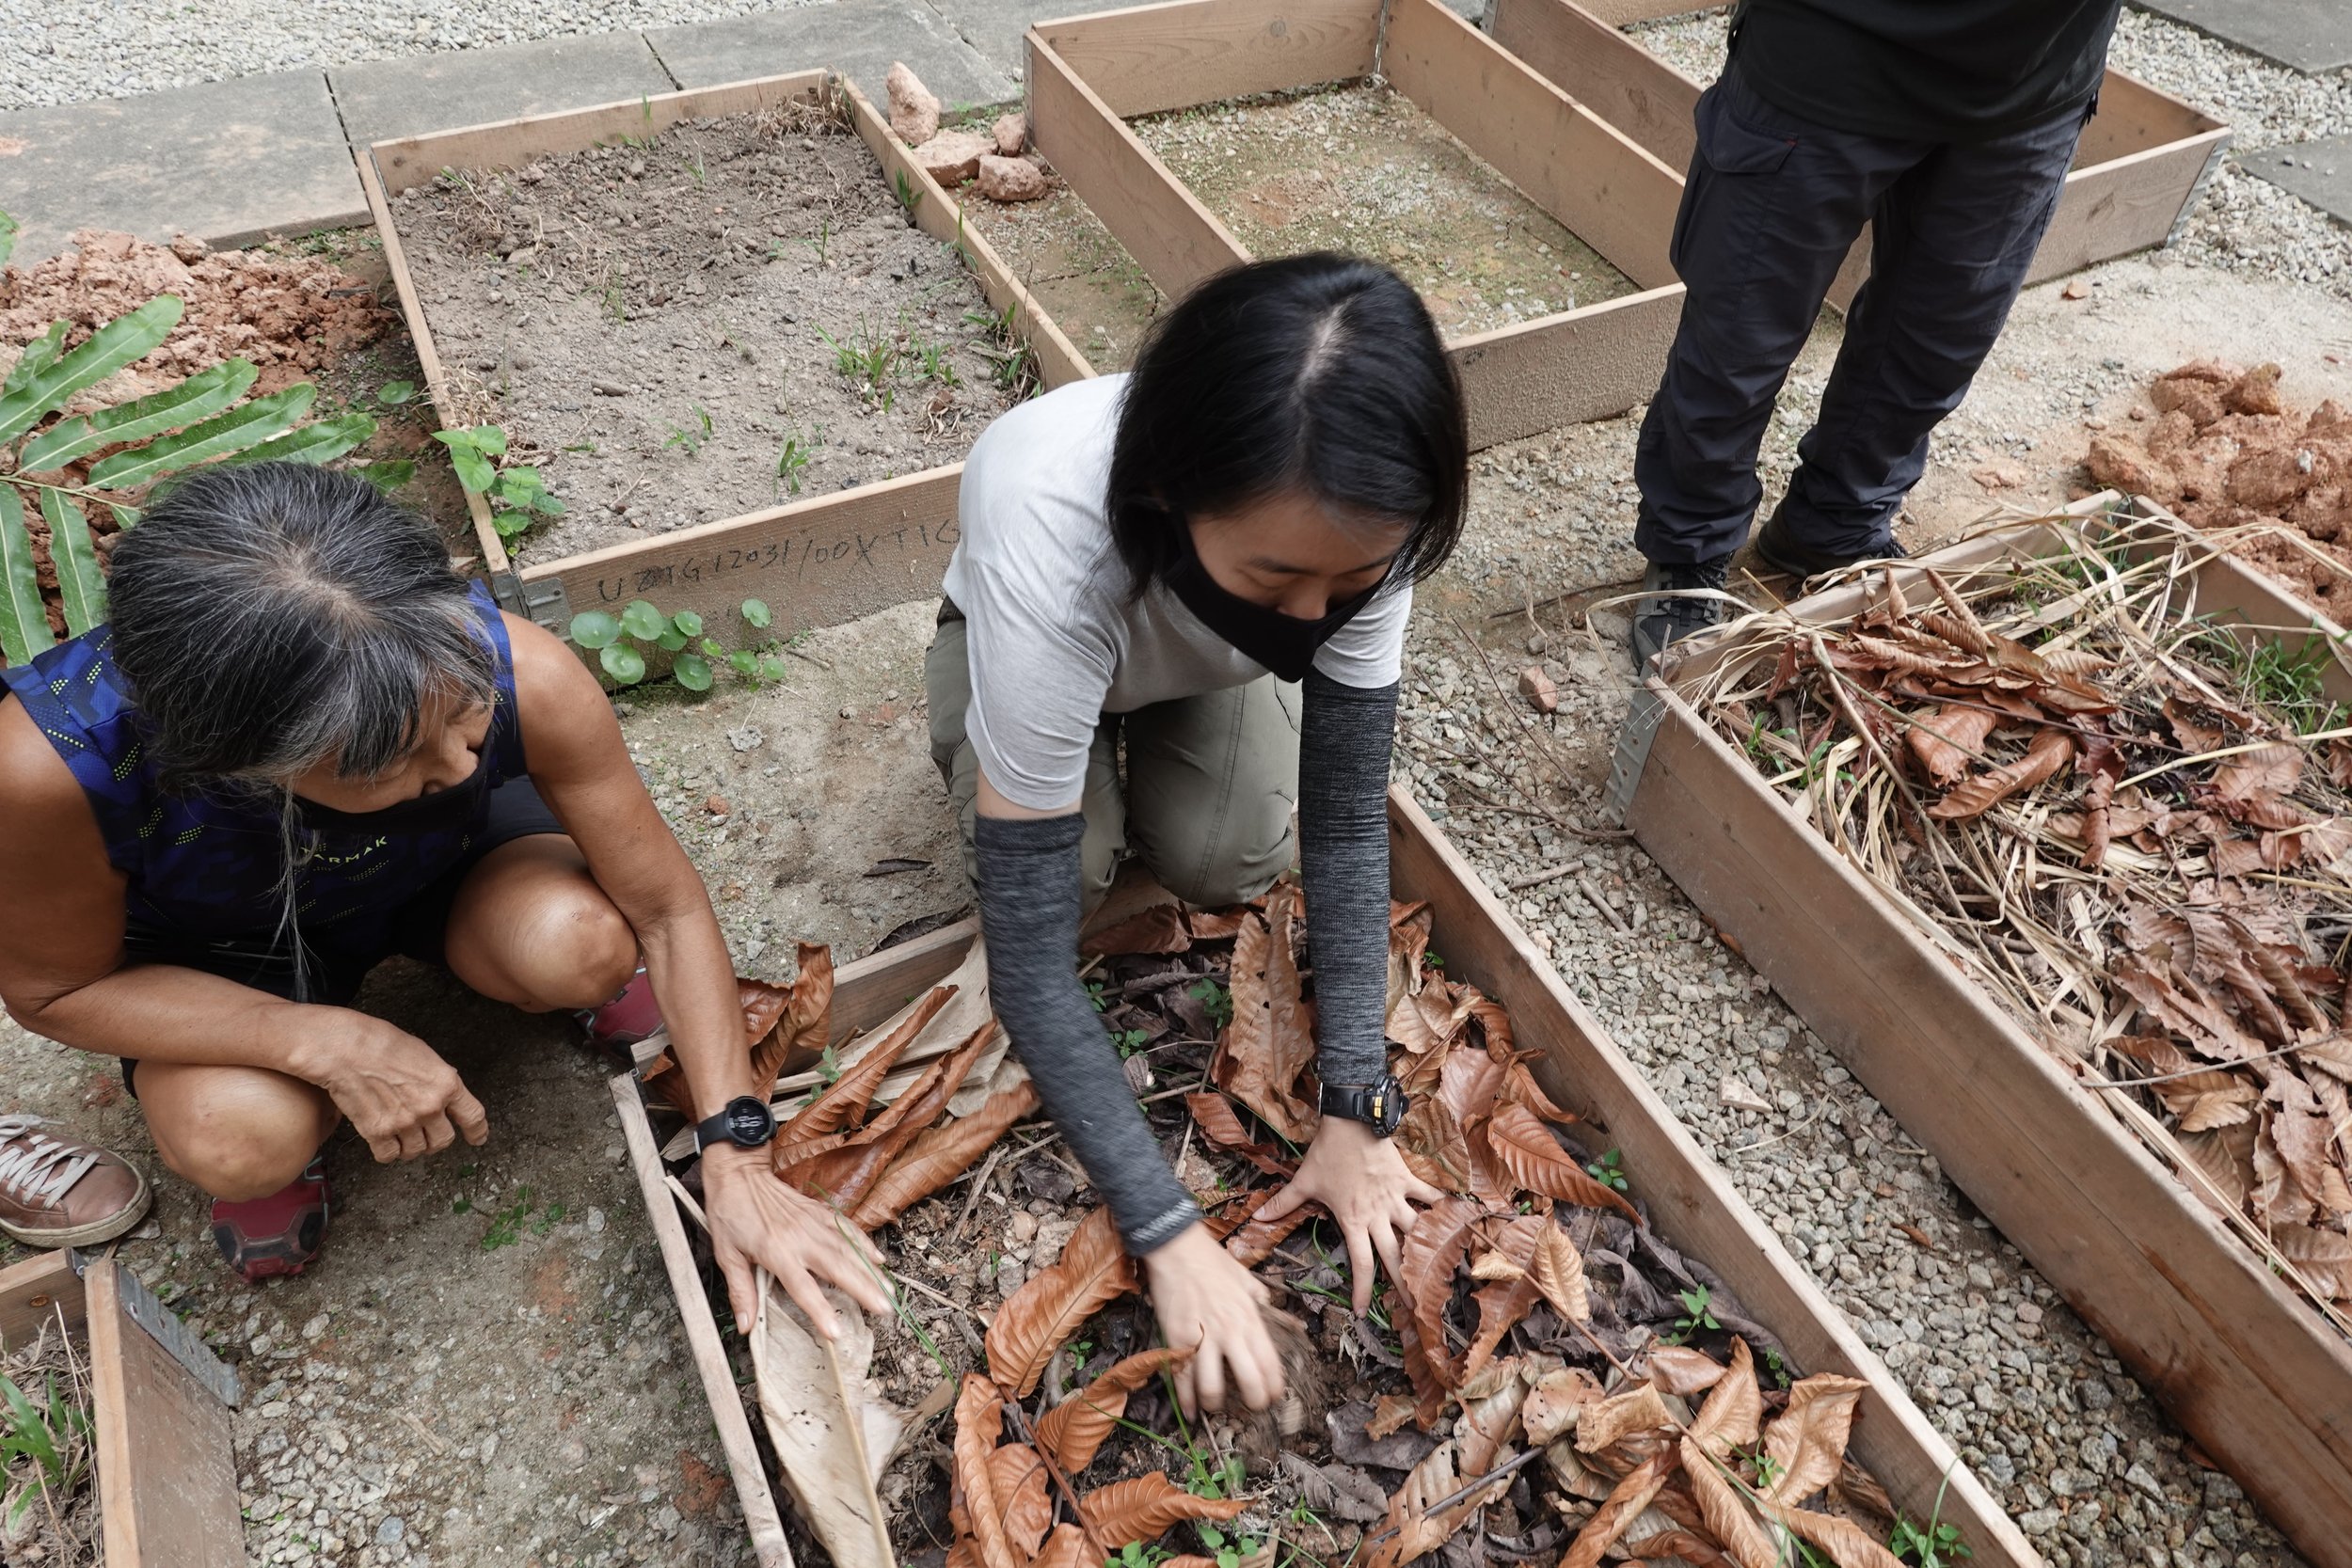
At Wah Son, the gardener usually digs down 25 cm and lays thick branches from tree prunings, followed by food scraps and green mulch from what she has trimmed around the garden. The green organic matter is usually in the form of mombasa grass, pigeon pea, sun hemp, or lemongrass. She will then cover the materials with the original soil that has been dug up, which is often very orange and sticky clay. After which, she will mulch with dried leaves or smaller broken branches and twigs. The pile will be left to sit for 3 months, but if space is tight, she will start to grow sweet potato leaves, lemongrass or jack beans in 2 weeks. As the materials in the bed break down, the lemongrass roots help to break through and improve the structure of the clay.
It’s very important to not skip the last layer of preparing the soil bed - mulching. Mulching is like putting a blanket on your soil bed to protect and make your soil bed cosy and comfortable. This “blanket" is a covering of organic materials such as dried leaves, dried twigs, wood shavings, and grass cuttings that are placed onto the soil surface. The intention is to protect the soil bed from being dried out under the hot sun, retain moisture in the bed, and create a damp and dark condition for the growing microorganisms to slowly make a home in your garden bed. These mulch materials break down over time and become organic materials feeding the soil.
![IMG_4752[1].jpg](https://images.squarespace-cdn.com/content/v1/69c29f129fefd45d93e75237/1782266782211-9GX1Q3FWKPXNKKIADPGR/IMG_4752%5B1%5D.jpg)
![IMG_4787[1].jpg](https://images.squarespace-cdn.com/content/v1/69c29f129fefd45d93e75237/1782266782216-AL1ZRIA4K3NZJNIYQRY0/IMG_4787%5B1%5D.jpg)
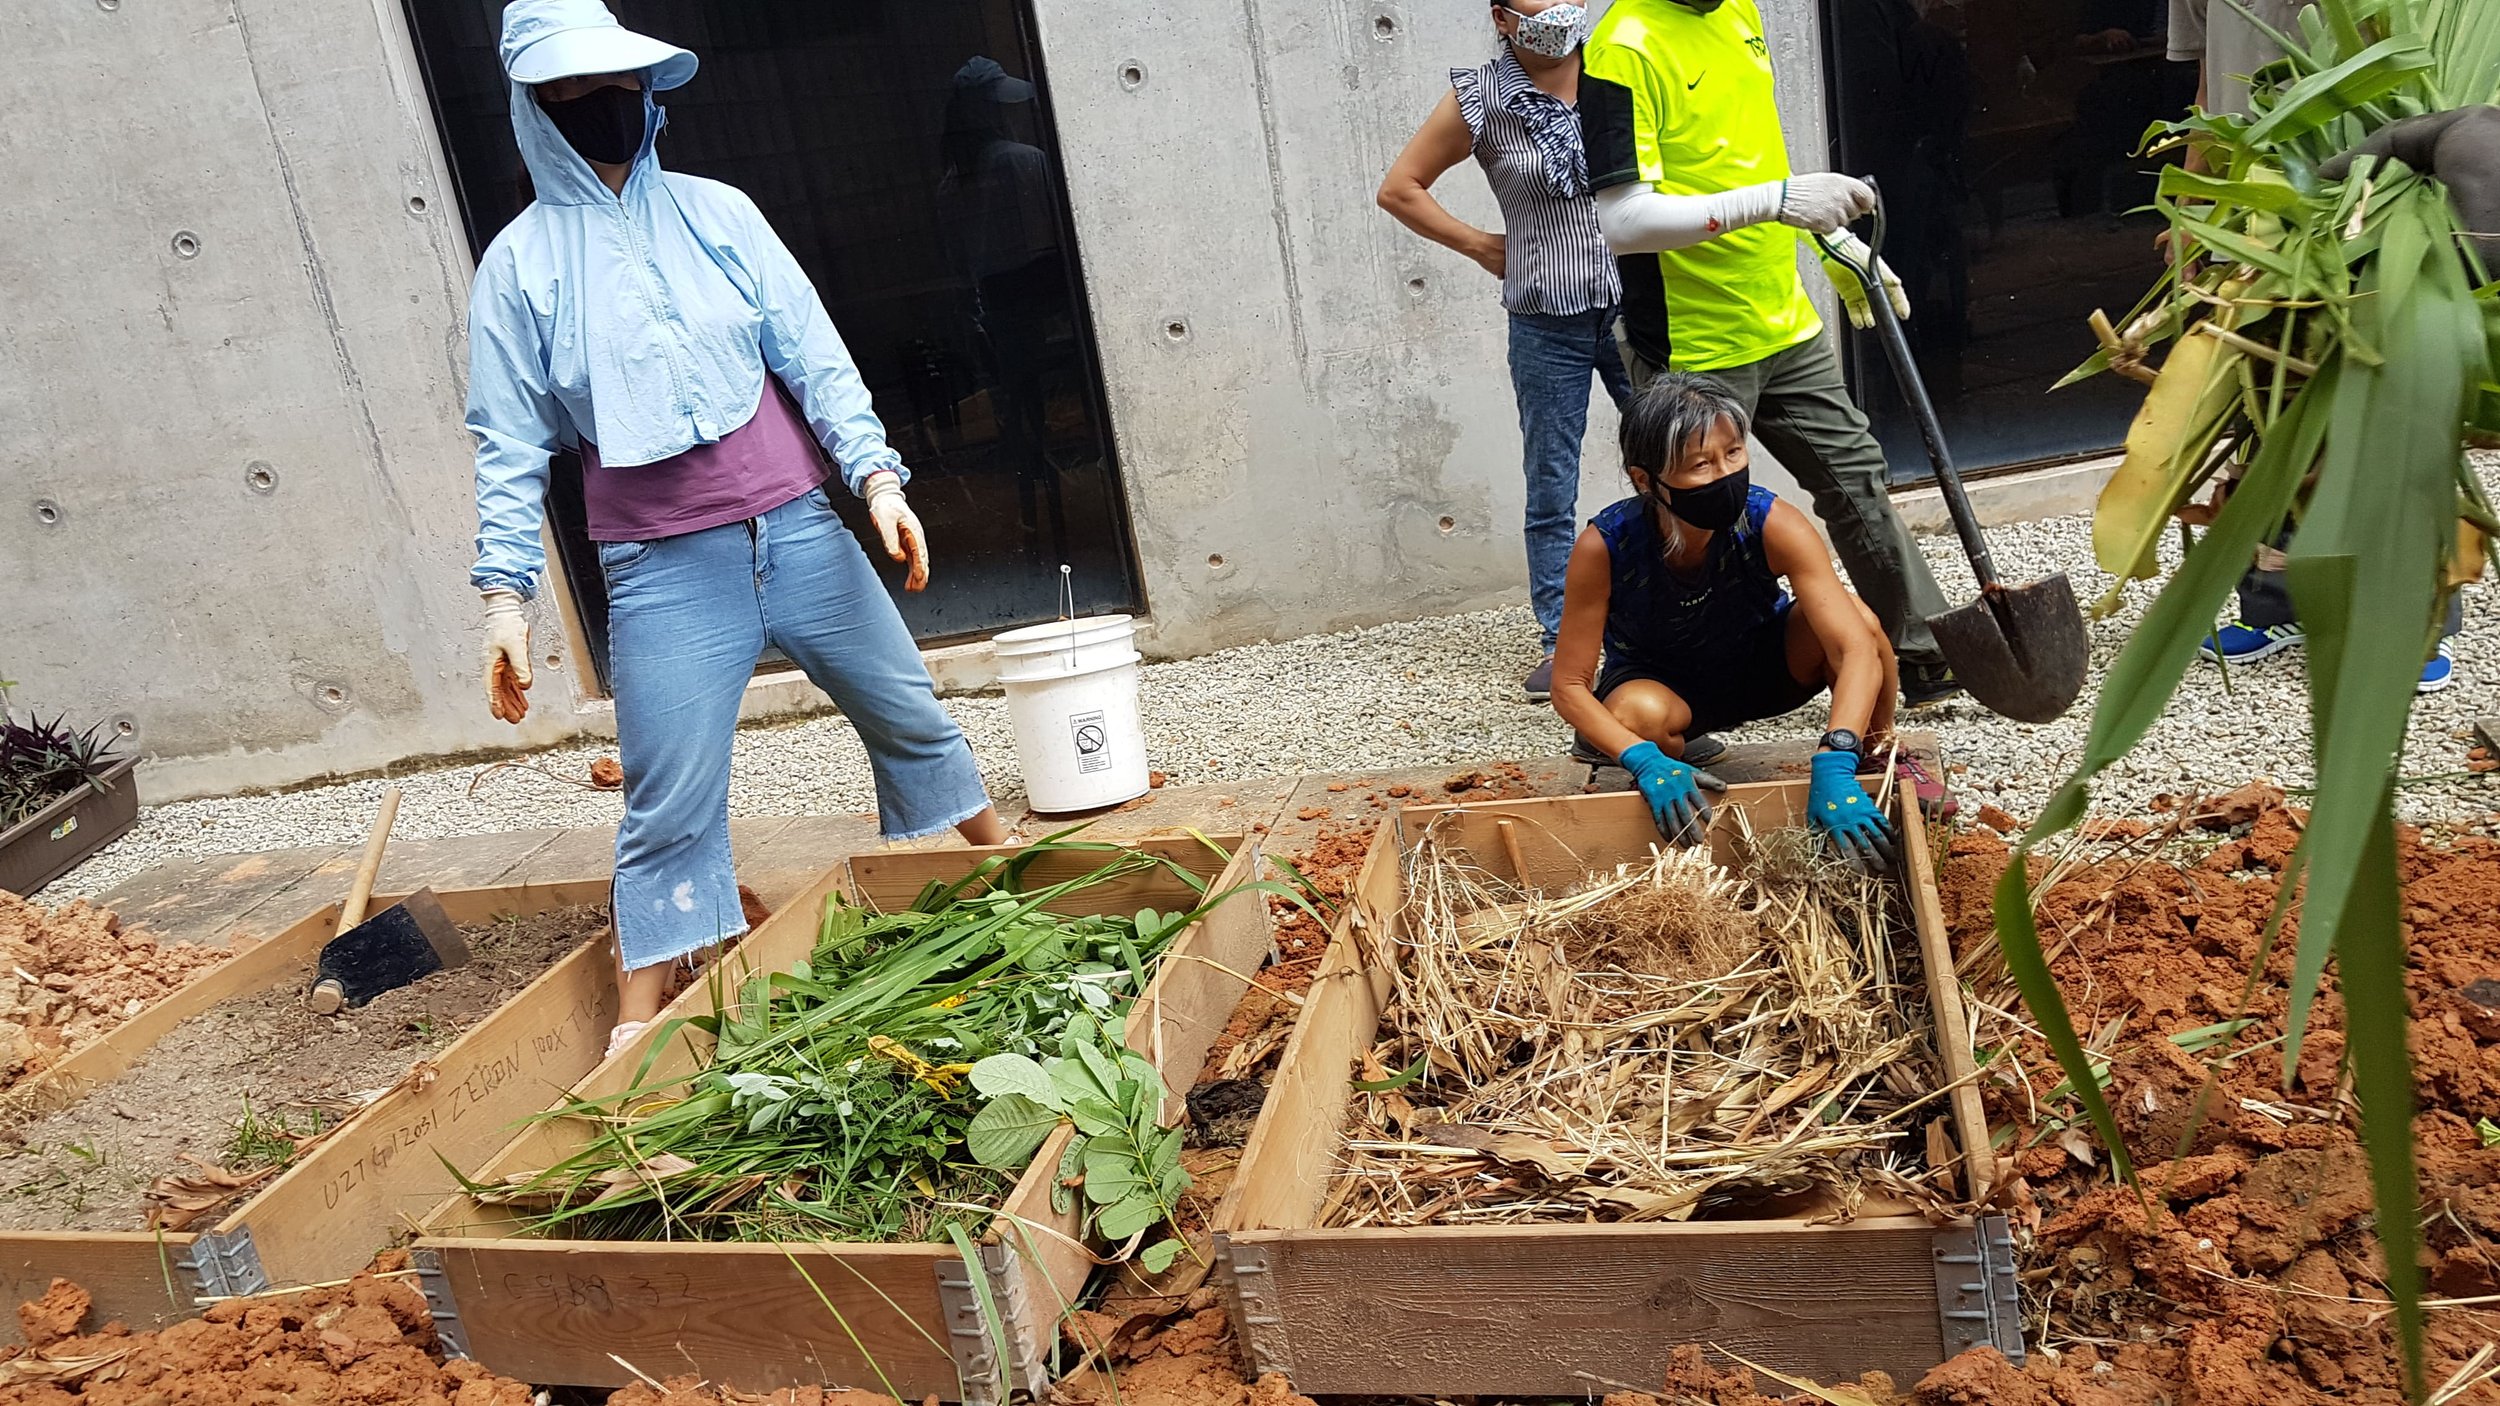
Example of Hugelkutur gardening in Singapore. From digging the trench, to layering with twigs, and then adding the garden prunings. The layers of compost, soil, and mulch are not shown here.
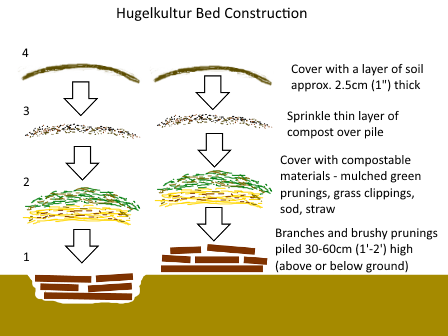
Source: deepgreenpermaculture.com
HOW-TO GUIDE: Modified Hügelkultur Method
This is focused on the modified version preferred by Singaporean gardeners where the bed is mainly underground. If you are interested in the traditional aboveground version, here is an example.
Identify a garden bed with unhealthy soil where you would like to build the Hügelkultur bed.
Dig a big trench about 25cm deep in the garden bed. The size of the trench should be just slightly smaller than your garden bed. Set the soil aside to use later.
At the bottom of the trench, lay a thick layer of thick branches and twigs.
On top of this, add a layer of raw food scraps (fruit and vegetables are ideal) and garden prunings (leaves, smaller twigs, or green manure).
Pour a layer of compost (ideally with visible living organisms) over the food scraps and green material.
Top everything off with the original soil that was set aside.
Cover the soil with a thick layer of dried leaves (mulch) and allow the bed to rest for a few days.
After a few days, you can begin planting some regenerative crops to support the soil (see this article to learn more about regenerative plants in Singapore). For other crops, we recommend waiting around 2-3 weeks before beginning to plant.
*In rooftop farms or urban gardens, there may be little access to soil in the ground. Typically, we have found they may have only 30cm depth of soil before they hit concrete or water pipes. In these cases, it is best to create the Hügelkultur mound in the traditional way above ground instead of digging into the depth of the soil.
Bed prep as a continuous process
While bed preparation is often viewed as the beginning of a garden, growing food is not a linear process but a continuous cycle of growth, decomposition, renewal, and regeneration. Practices such as Food Forests and Hugelkultur reflect and support these natural systems, creating resilient ecosystems that continually build soil health and fertility. In this way, soil bed preparation is not a one-off task but a foundational part of an ongoing regenerative approach to gardening. It requires observation, experimentation, and experience as gardeners learn to work with, rather than against, natural processes. By embracing this cyclical journey and finding enjoyment in the process, gardeners can cultivate healthier soils, more sustainable food systems, and ultimately reap the rewards of their efforts.
